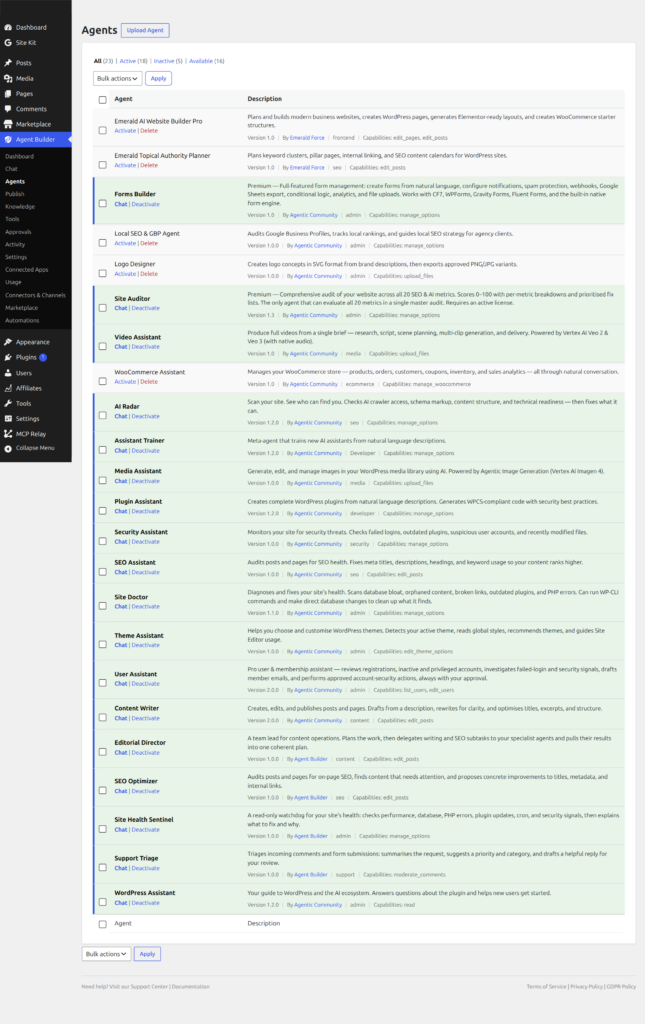
Agent Builder → Installed Agents is the central management screen for all your AI assistants. It works similarly to the WordPress Plugins page — you can activate, deactivate, and delete assistants from here.
The Agent List
Each row shows the agent name, a short description, its current status (Active or Inactive), and action links. Four types of agents appear in this list:
- Bundled agents — shipped with Agent Builder and always available. They cannot be deleted.
- Premium agents — installed by you from a
.zipfile downloaded from the marketplace. - No Code agents – your own agents that you created using the Assistant Trainer.
- Custom agents – your own agents that was created by your Developer.
Activating and Deactivating
Click Activate to enable an agent. Once active it is available in the chat interface, can run scheduled tasks, and will respond to event triggers. After activation a notice appears with a direct link: Chat with this agent now →
Click Deactivate to pause an agent without removing it. Deactivated agents retain their configuration but will not run tasks or respond to hooks until reactivated.
Bulk Actions
Use the checkboxes and the Bulk Actions dropdown to activate, deactivate, or delete multiple agents at once. This is useful after uploading and installing a batch of agents.
Installing a New Agent
To install an agent .zip file:
- Purchase or download the agent
.zipfrom the marketplace. - On the Installed Agents page, click Upload Assistant.
- Choose the
.zipfile and click Install Now. - If the archive is a premium agent the Installation will fail if the license cannot be verified.
- Once installed, click Activate to start using it.
Deleting an Agent
Click Delete to permanently remove an uploaded agent and its files. Built-in agents cannot be deleted. Deleted agents can be downloaded and re-installed from the marketplace at any time.
Frequently Asked Questions
What is the difference between a bundled agent and a custom agent?
Bundled agents are shipped with Agent Builder and maintained by the Agentic team — the free plugin bundles eight: Content Writer, WordPress Assistant, SEO Optimizer, Site Health Sentinel, Support Triage, User Assistant, Editorial Director, and Assistant Trainer. Agent Builder Pro adds nine more specialists — SEO Assistant, Security Assistant, Site Doctor, AI Radar, Media Assistant, Plugin Assistant, Theme Assistant, plus upgraded Assistant Trainer and User Assistant. Bundled agents are always available, always up to date, and cannot be deleted. Custom agents are built either by you using the no-code Assistant Trainer, or by a developer who wrote agent code and provided it as a file. No Code agents use the built-in agent framework with a custom system prompt and tool selection. Developer-built custom agents can contain entirely custom code, tools, and integrations not available in the standard framework.
Do I need to activate all agents, or just the ones I plan to use?
Activate only the agents you plan to use. Inactive agents use no resources — they do not run scheduled tasks, respond to event triggers, or appear in the chat interface. There is no penalty for leaving agents deactivated; they retain their configuration and can be reactivated at any time. If you have a large number of installed agents, keeping unused ones deactivated makes the chat interface dropdown easier to navigate and ensures event automation does not route messages to agents you are not actively maintaining.
Can I install agents from the marketplace without a paid license?
No. Marketplace agent downloads require a Personal or Agency license. The license is verified during installation — if the archive is a premium agent and your license cannot be confirmed, the installation will fail with an error message. You can still view and browse the marketplace without a license, but downloading and installing agents from it requires at least a Personal plan. Free users can only install agents they built themselves using the Assistant Trainer or received directly as a .zip file from a developer. See Licensing and Pricing for plan details.
What happens to an agent’s scheduled tasks when I deactivate it?
Deactivating an agent pauses all of its scheduled tasks. Any tasks that were queued or running at the time of deactivation are stopped. The task configuration is preserved — schedules, triggers, and task definitions all remain intact. When you reactivate the agent, scheduled tasks resume on their next scheduled run. If a task was mid-execution when the agent was deactivated, it will restart from the beginning on the next trigger, not from where it left off. If you need to temporarily pause scheduled tasks without deactivating the entire agent, you can disable individual tasks from Agent Builder → Scheduled Tasks.
Can I export an agent I built and install it on another site?
Yes. No Code agents you build with the Assistant Trainer can be exported as a .zip file and installed on any other WordPress site running Agent Builder. Go to the agent’s settings, find the Export option, download the .zip, then upload it via Upload Assistant on the target site. If you list your agent in the marketplace, this export is handled automatically as part of the submission process. Developer-built custom agents work the same way — the .zip file is the portable package that can be shared and installed.
Related Articles
Ready to put this to work?
Agent Builder is free forever — 8 AI agents, 261 tools, no API key needed.
Download Free Compare Free vs Pro