A shortcode is a small snippet of text — wrapped in square brackets — that you paste into any page, post, or widget area to embed dynamic content. WordPress replaces the shortcode with real content when the page is displayed.
You do not need to write any code to use a shortcode. If you can copy and paste text, you can use shortcodes.
🔌
Plugin Assistant
shortcodeWhat Does a Shortcode Look Like?
A shortcode looks like this:
[agentic_form id="5"]The part inside the brackets is the shortcode name (agentic_form), and id="5" is an attribute that tells the shortcode which form to display. Different shortcodes accept different attributes — the Forms Builder assistant will always give you the exact shortcode to use, already filled in.
Pasting a Shortcode — Block Editor (Gutenberg)
WordPress uses the Block Editor by default. Here is how to add a shortcode to a page or post:
- Open the page or post you want to edit.
- Click the + button to add a new block.
- Search for Shortcode and select the Shortcode block.
- Paste your shortcode into the input field (for example
[agentic_form id="5"]). - Click Update or Publish to save the page.
The form (or other content) will appear on the live page immediately after saving.
Pasting a Shortcode — Classic Editor
If your site uses the Classic Editor plugin, the process is even simpler:
- Open the page or post you want to edit.
- Click in the content area where you want the form to appear.
- Type or paste the shortcode directly — for example
[agentic_form id="5"]. - Click Update or Publish.
Form Shortcodes from Forms Builder
When you ask the Forms Builder assistant to create a form, it gives you two shortcodes automatically:
| Shortcode | What it does |
|---|---|
[agentic_form id="X"] | Displays the form so visitors can fill it in and submit it. |
[agentic_form_entries id="X"] | Displays a table of submitted entries. Visible to admins only by default. |
Replace X with the form ID the assistant gives you — for example [agentic_form id="12"].
Viewing Form Submissions
To display the entries table on a page, paste [agentic_form_entries id="X"] into a private page so only admins can see it — or tick Make private in the WordPress page settings. By default the entries shortcode is admin-only, meaning it shows nothing to logged-out visitors even if placed on a public page.
The entries shortcode accepts a few optional attributes:
limit="20"— number of entries to show per page (maximum 100).page="1"— which page of results to show.public="1"— allow any logged-in user (not just admins) to view entries.
Example: [agentic_form_entries id="12" limit="50"]
Common Questions
The shortcode is showing as plain text on my page.
You likely pasted it into a Paragraph block instead of a Shortcode block. Delete the paragraph, add a Shortcode block, and paste again.
The form is not appearing.
Check that the form ID in the shortcode matches the one the assistant gave you. You can ask the assistant “list my forms” to confirm.
The entries table shows nothing.
Either no submissions have been made yet, or you are viewing the page while not logged in as an admin. Log in to WordPress and refresh the page.
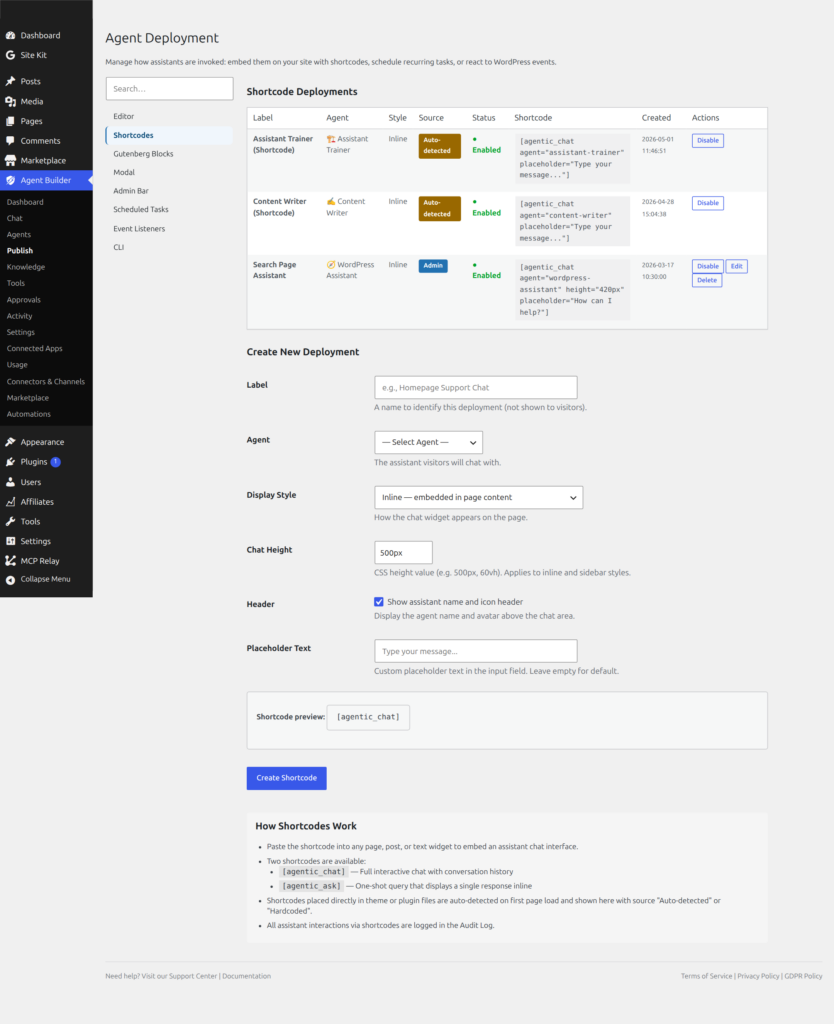
Chat Shortcode Reference
The [agentic_chat] shortcode embeds a full chat interface anywhere on your site. All attributes are optional — [agentic_chat] on its own renders your first available agent with default styling.
| Attribute | Default | What it does |
|---|---|---|
agent | first available agent | Agent slug, e.g. agent="content-writer" |
style | inline | inline embeds the chat in the page; popup shows a floating launcher button |
height | 500px | Height of the inline chat window, e.g. height="600px" |
placeholder | Type your message… | Placeholder text in the message input |
show_header | true | true/false — show or hide the chat header bar |
context | empty | Extra instructions injected as page context (see below) |
Example: [agentic_chat agent="support-triage" style="popup" height="450px" show_header="false"]
Page Context
The context attribute lets you give the AI assistant awareness of where the visitor is and what they’re interested in. This is powerful for sales pages, product pages, and landing pages where the same assistant needs to tailor its responses to different audiences.
[agentic_chat agent="wordpress-assistant" style="popup" context="This visitor is on the SEO landing page. They are interested in improving their Google rankings."]The context is injected into the assistant’s system prompt as a [PAGE CONTEXT] block. The assistant sees it on every message but the visitor does not.
Auto-Context
Even without an explicit context attribute, the chat widget automatically sends the current page title, URL path, and referrer to the assistant. This means any embedded chat is always aware of which page the visitor is on.
The explicit context attribute adds on top of the auto-context — use it to provide specific instructions like “focus on pricing questions” or “this visitor came from a Google ad about security.”
Making Assistants Context-Aware via Personas
To make an assistant respond differently based on page context, add instructions in Settings → Instructions → Persona Notes:
You are context-aware. Every conversation includes a [PAGE CONTEXT] section telling you which page the visitor is on and how they arrived. Use this to tailor your responses naturally. If they are on a pricing page, focus on value and plans. If they are on a landing page about SEO, focus on SEO benefits. Never mention that you can see their page context.Combined with the Knowledge field (for product facts, pricing, and FAQs), this creates a context-aware sales assistant that adapts to every page without needing separate agents.
Ready to put this to work?
Agent Builder is free forever — 8 AI agents, 261 tools, no API key needed.
Download Free Compare Free vs Pro