Why Do I Need an API Key?
Agent Builder supports nine LLM providers. Agentic AI (Experimental) is selected by default and requires no API key — and no account needed. For the other cloud providers you will need an account and an API key to get started. You can also add custom providers or manage the full provider registry from the Providers tab in Settings.
Your API key stays on your server. It is stored securely in your WordPress database and is never shared with us or any third party.
Supported LLM Providers
Agentic AI (Experimental) — No API Key Needed
Agentic AI is a WordPress-optimised AI model hosted by agentic-plugin.com. It is selected by default on fresh installs — no account or API key required.
- In Agent Builder → Settings, select Agentic AI (Experimental) as your provider
- Click Connect Agentic AI — no key required
Agentic AI is available free with a paid Plugin License. Requests go through a shared pool, so responses may occasionally be slower than paid cloud providers.
OpenAI (GPT-4)
- Create an account at platform.openai.com
- Go to API Keys in your account settings
- Click Create new secret key
- Copy the key (it starts with
sk-)
OpenAI offers a free tier for new accounts. Pricing is usage-based and changes over time — always check the OpenAI pricing page for current rates.
Anthropic (Claude)
- Create an account at console.anthropic.com
- Go to API Keys
- Click Create Key
- Copy the key
xAI (Grok)
- Create an account at console.x.ai
- Navigate to API Keys
- Generate a new key
Google (Gemini)
- Create an account at aistudio.google.com
- Click Get API key
- Create or select a Google Cloud project
- Copy the key
Mistral
- Create an account at console.mistral.ai
- Go to API Keys
- Click Create new key
- Copy the key
Meta Llama
- Visit llama.meta.com and create an account
- Request API access and navigate to API Keys
- Generate a new key and copy it
Cohere
- Create an account at dashboard.cohere.com
- Go to API Keys
- Create a new key — Cohere offers a free tier
Ollama (Local — Free)
Ollama lets you run open-source AI models directly on your server or local machine. No API key is needed and no data ever leaves your infrastructure — making it the most private option available.
- Download and install Ollama from ollama.com
- Pull a model:
ollama pull llama3.2(or any supported model) - Ollama starts a local server at
http://localhost:11434by default - In Agent Builder → Settings, select Ollama as your provider
- Enter your Ollama server URL (e.g.
http://localhost:11434) - No API key is required
If Ollama is running on a separate server (not the same machine as WordPress), replace localhost with that server’s IP address or hostname, and make sure port 11434 is accessible. For production WordPress hosting, you will typically need a dedicated server or VPS with enough RAM to run the model (4 GB minimum; 8 GB+ recommended).
Ollama is completely free to use. The trade-off versus cloud providers is speed and model capability — local models are generally slower and less capable than GPT-4 or Claude, but they are ideal for cost-sensitive or privacy-first use cases.
Also see: Choosing a Service Provider
Entering Your API Key
The easiest way to connect is through the Setup Wizard, which launches automatically on first activation. It walks you through provider selection, account creation, and API key setup with step-by-step screenshots. You can re-run it at any time from Agent Builder → Dashboard.
To configure manually, or to update your key later:
- In WordPress admin, go to Agent Builder → Settings → General
- Select your AI provider from the dropdown
- Paste your API key
- Select a Model and Agent Mode
- Click Save Changes
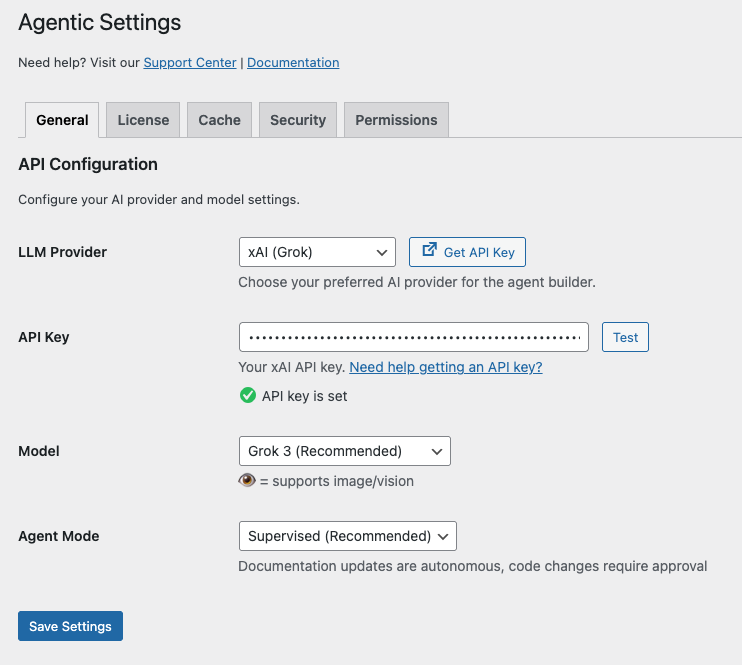
Click on Test – if it succeed – Click on Save Settings.
That is it.
All your AI assistants will now use your favourite AI provider for their capabilities.
Choosing a LLM Model
Once you have selected an AI provider, the Model dropdown lets you choose which specific model to use. Each provider offers several models at different capability and price points — for example, a “mini” or “flash” model is faster and cheaper, while a “large” or “pro” model is more capable but costs more per request.
Next to the Model dropdown you will see a Model Information link. Click it to open the provider’s official model documentation in a new tab. This page lists every available model along with its context window size, capabilities (such as image/vision support), and up-to-date pricing. We strongly recommend reading this page before choosing a model — the difference in cost between a lightweight and a premium model for the same task can be an order of magnitude.
A few things to consider when picking a model:
- Capability vs. cost — premium models produce better results but cost significantly more per request. Start with the recommended default and only upgrade if quality is insufficient.
- Context window — a larger context window lets the assistant handle longer conversations and bigger documents, but also uses more tokens (and costs more) per call.
- Vision support — models marked with 👁 can process images. Only enable this if your workflow requires it, as image inputs consume significantly more tokens.
- Speed — “mini”, “flash”, and “fast” variants respond quicker and are ideal for high-volume or time-sensitive tasks.
You can switch models at any time from Agent Builder → Settings → General. Agent Builder remembers the last model you used for each provider, so switching between providers and back will restore your previous selection automatically.
Understanding LLM Provider Costs
All cloud AI providers charge based on usage — typically measured in tokens (roughly three-quarters of a word). Costs vary significantly between providers and between models within the same provider. A lightweight model may cost ten times less per request than a premium one, with some trade-off in capability.
Always check the official pricing page for your chosen provider before committing to a model. Prices change frequently and any figures published elsewhere (including this page) may be out of date.
- OpenAI pricing
- Anthropic (Claude) pricing
- xAI (Grok) pricing
- Google (Gemini) pricing
- Mistral AI pricing
- Meta Llama pricing
- Cohere pricing
- Agentic AI — free with a paid Agent Builder Plugin License
- Ollama — always free; models run on your own server
Most providers let you set a monthly spending cap in their dashboard — we strongly recommend doing this before you start so there are no surprises on your bill. Disclaimer: The responsibility to monitor and manage your AI provider costs rests entirely with you. See our Terms of Service for full details.
What Is a Token?
AI providers charge by the token — roughly three-quarters of a word. Longer conversations and more complex tasks consume more tokens and therefore cost more. The Dashboard and Audit Log show token counts per request so you can see exactly how much activity each assistant is generating.
You can review your actual consumption and spending at any time in your provider’s own usage dashboard. Each provider also lets you set a hard monthly spending limit — use this to protect against unexpected charges.
If you run out of credit, the AI provider will return an error and the assistant will display a message saying it could not get a response. No data is lost — your conversation history remains intact and you can retry once you add more credit.